Introduction: Dots or Lines
To understand how to use image-editing tools on a computer, one must first understand how images are interpreted by a computer. In general, a computer will encode an image into its memory in one of two ways. This is because computers must store information discretely[^1]. What does this mean for images? Basically, it means that images are stored as mathematical formulæ.
Pixels (“Dots”)
The first formula is based on the concept of dots, where each dot has
a colour and location (x, y) stored for the image. Because these dots
resemble a 2-dimensional map and because each chunk of information on
each dot is called a bit, this form of storage is called a bitmap.
Common bitmap formats (filetypes) include: jpg / jpeg, png,
tiff, and gif. Bitmaps are typically used when taking or
manipulating a photograph. They fall short on more archival or artistic
projects such as icons, comics, or logos. For these projects, one would
want to use the next variety of image storage: Vectors.
Vectors (“Lines”)
The other formula is newer and is based on the concept of lines. Each
line is created by combining one or more points[^2] together. By
calculating the curve of each point and adding properties like colour
and fill, an image is stored into vectors. Common vector filetypes
include: svg, ai[^3] Vectors are a powerful format in that they can
be scaled to any size with no reduction in quality. This makes them the
perfect choice for logos, posters, and other line-art. A good rule of
thumb is to use vectored image formats for anything involving text.
Vectors fall short when capturing image or true-to-life renderings, but
are fantastic at stylized displays.
Visualizing the difference
The difference between bitmaps and lines becomes quite apparent when scaling images, as in figure 1.
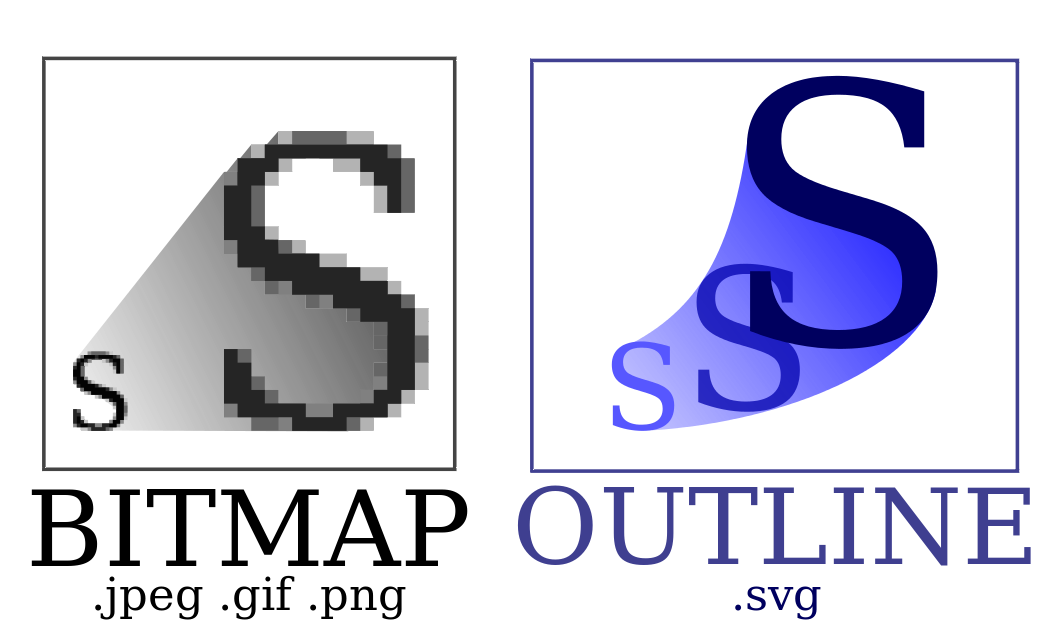
A comparison of bitmapped images (left) and vectorized images (right).
Common Concepts of all Image Editors
When creating, manipulating, or formatting any image type, there are a number of workflow and technological concepts to keep in mind. These concepts are essential to becoming proficient with any image manipulation tool.
Layers
All professional image editing software will include a concept of layers. Layers can be thought of as transparent slides upon which one can add media. This allows someone to experiment with say, a background colour, while keeping the rest of the image the same.
RGB vs CMYK vs Indexed
Computers store colours in three main ways, each with a particular purpose in mind:
RGB
Red, Green, Blue. These colours are used when displaying an image on the web or on another electronic device. These colours correspond to the physical pixel colours found in computer models.
CMYK
Cyan, Magenta, Yellow, Key[^4]. These colours are used when the file is going to be printed on a physical medium, such as paper.
Indexed Colour
Indexed colours refer to an image which has been compressed by removing un-used colours and only keeping track (indexing) of colours that are actually used in the image. This can make for poor quality photographs or gradients, but is useful for creating light-weight Internet images.
Cropping
Sometimes the best addition one can make to an image is a subtraction. By cropping an image, one removes the edges of an image in favour of a more central subject.
Transparency
Once an image has been created, sometimes one will want to use the image
with different backgrounds for different stylistic effects. This is
especially true for the web medium, and is essentially just another
application of the concept of layering (see above). Only certain
filetypes can allow transparency, some common types include: png,
gif, svg, and ai[^5].
Selection and Manipulation
Almost every concept in computer software usage comes down to the understanding of selection and manipulation. Once you understand how to select data (pixels or lines in this case) and how to change that data (through a variety of methods to be discussed), you will be on the first steps to the path of mastering the computer as a tool.
Keyboard Shortcuts
If you find yourself using the mouse more than the keyboard for selecting tools or making adjustments, then you will want to start learning common keyboard shortcuts for your most-used commands. Keyboard shortcuts are often shown in the right side of a selection in the file-menu.
Toolboxes
Every image-editing tool has a toolbox of some sort. Each toolbox has its own collection of unique tools suited for whatever task you throw at them. An image listing the different types of toolboxes is shown in this figure:
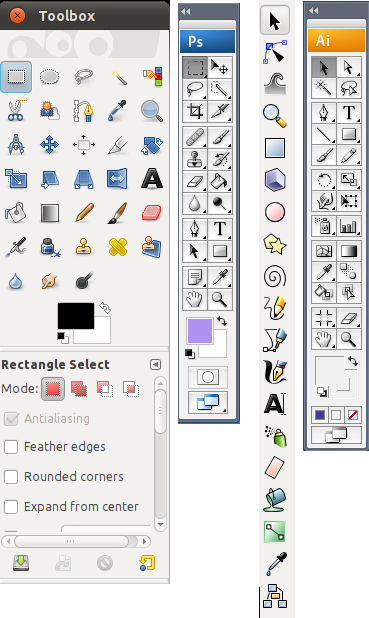
Different toolboxes of 4 different image-editing programs. From left to right: GIMP, Photoshop, Inkscap, Illustrator.
Pixels: Using Raster Editors
There are two main bitmaps editors available for professional use. The first is so popular it has become a verb and is synonymous with political controversy: Photoshop. Our contender is an open-source image manipulation program which has vastly improved in the past two years. Unlike Photoshop, the GIMP[^6] is offered as free software which has the specific meaning of allowing all the source code to be viewable and editable for free (a good analogy is Microsoft’s Encarta vs. Wikipedia) [^7] In the following sections, we will cover common ways to achieve tasks on both programs. There are subtle, but important differences to each program, and these will be discussed as they are encountered.
Selecting the Right Pixels
As mentioned previously, the first half to understanding a computer
program is to understand the data it selects and how it makes that
selection. Pixel-based editors select, well… pixels. And sometimes this
can be really helpful, because pixels tend to clump together in various
patterns which can be selected. To make a selection, first select a
selection tool (specific ones are covered below) and click and drag on
the pixels you want. To add to the selection, hold down the shift
button before you click again. To subtract from the selection, hold
down the alt (option in Apple systems) key before you click again.
With a combination of these addition and subtraction properties, along
with some specific selection types, one can usually easily find the
right selection.
Feathering
One more thing one can do while selecting pixels is feather them.
Feathering pixels means that a subset of pixels will be selected around
the edges of the selection. This sort of selection is handy for creating
a faded effect, or for subtle transitions from the adjusted selection to
the unadjusted parts of the image. To feather a selection in
Photoshop, click on the selection tool, then change the feather amount
in the toolbar (the standard location is the upper left part of the
screen). In the GIMP, the order to add feathering is slightly
different: first make your selection. Then, from the Select menu in
the toolbar, click on Feather… and choose the amount of pixels you’d
like to feather the selection by.
The Basic Box-Selection Model
The most basic selection tool is the marquee or box selection tool. To
use this tool, click on the rectangular selection icon [^8] in the
toolbar. Then, select a box of pixels in the image. Remember, you can
adjust the amount of selection by using the shift and alt keys.
Other Polygon Selections and the Freeform Tool
Another kind of selection tool is the polygon selection tool. To use
this tool, select the edge of the part you want to select. This will
create a point. When you click on the next edge, a line will be drawn
between the points. Continue drawing around your selection in this
manner until you hit the first point again (alternatively, you can press
Enter to get the first and last point to complete each other with a
line). This will create a selection in the shape of the polygon you
specified. To change points on the selection, just click and move them
after making the selection (CS 3 or higher, GIMP 2.2 or higher). To
delete a selection point, drag a point off of the canvas.
Sometimes the polygon tool is too complicated for a simple selection. In these cases, you will want to use the freeform select tool (also known as the lasso). This tool is not good for complicated selections, as it requires you to click and drag the entire selection, rather than setting up points from which you can re-draw a selection. To use this tool, choose it from the toolbar and draw around your selection by clicking and dragging the mouse cursor.
Selecting by Colour and other Properties
There are times when we want to remove or replace a single colour, or a set of similar colours in the same region. This sort of selection is known as uniform selection and is sometimes known in Photoshop as the magic wand tool. The best way to understand this tool is to experiment, but here are some tips to help you get started:
-
Selections can be all of the same colour in the same region, or all of the same colour regardless of region. The settings for this vary from program to program.
-
The tolerance of this tool is directly related to how many pixels it will select; a higher tolerance will select more pixels with similar properties.
Remember, you can still use Shift and Alt to add to and subtract
from your selection. With this tool in particular, one can make the
perfect combination of selections to achieve your editing goal.
Manipulating the Selection
The power of computational image processing really shines once you start trying to make adjustments to your selection. By making the right adjustments with the right amounts, you can achieve whatever artistic effect you need to.
Colour and Brightness
Remember when I mentioned that there are two image colour categories?
This manipulation is where this distinction can really make a
difference. To change colour levels in Photoshop, click on Image >
Adjustments > Colour Balance… and change the levels accordingly. The
GIMP puts color adjustments into its own menu, and the colour balance
options can be found under Colours > Colour Balance….
To adjust brightness and contrast in Photoshop, click on Image >
Adjustments > Brightness/Contrast… and in GIMP, click on Colours >
Brightness-Contrast….
A combination of these tools is found in the Curves menu of each program. Curves are an advanced way of looking at all of the colours (on the x-axis) and changing their values (on the y-axis) by an indexed amount (variations of 1.0). This means that a 1:1 line will be 45° and is un-manipulated. Points are added to the line by clicking on the line, and removed by dragging the line off.
Curves are accessible in Photoshop by going to Image > Adjustments >
Curves… and in GIMP by going to Colours > Curves….
Filters
Filters are miscellaneous adjustments one can make to an image to give them a special effect. This is also the main way in which Photoshop and the GIMP differ. Photoshop has more filters and those filters tend to have more pleasing effects, however the GIMP uses its own filters and can hold its own for a number of artistic types of filters.
Both the GIMP and Photoshop have a Filter menu item in the toolbar. Be
sure to make a selection before using this menu.
Lines: Using Vector Editors
Because Vector editors store lines and points instead of individual pixels, their editing programs are quite different. The two programs we will be discussing are Adobe Illustrator and Inkscape. Once again, Illustrator is a proprietary program while Inkscape is an open-source alternative. However, Inkscape isn’t modelled after Adobe Illustrator, it is modelled after Corel Draw. This means that there are more differences than similarities between the two programs. Hopefully, this guide will explain the similarities and differences enough to give you a chance to try each program out on your own.
Selecting Points and Lines
When selecting with a vector-editor, we are selecting lines and points rather than pixels. Because lines can be grouped together to make certain images, there are two distinct selection tools: the Arrow and the Direct Select tool. The arrow tool will typically select a group of objects or an entire line, while the direct select tool will select individual points or line segments.
Drawing Points and Lines
There are a number of methods to add a point or line to your document. The easiest way is to use the Pencil Tool (available in both editors) and free-drawing the line. This method has a number of drawbacks, a primary one being that it creates too many points, causing a rougher-looking final product.
The Pen Tool
This is The most difficult tool listed in this guide, but once you understand the initial workings of the pen, you will find it to be indispensable. The Pen tool is in fact also available in Photoshop, albeit a less powerful version.
To use the pen tool, understand that every point now corresponds to a line and a curve. A curve in this case is the direction in which the point will direct the line. To adjust a curve, select a point on the line, then select one of the handles that appears next to that point and drag it to change the curve direction.
To remove a point in photoshop, first use the direct
Manipulating Points and Lines
Manipulating points on a line in a vector image will change the shape and direct of the line. This manipulation is a lot different than changing pixels in that each point contains a lot more information.
To select a point, click on the direct select tool (in Photoshop) or
the edit path by node tool. Then, click on the point you want to
manipulate. If you want, you can
manipulate multiple points by holding the shift key down before you
click on the next point.
Each individual point has a number of options which changes the way in which the line is affected by the point. To affect the point, one or more handles will apprear around the point once selected. These handles will change the direction and velocity of each line[^9]. Asymmetric points can have different handle lengths on each handle, while symmetric points will adjust all handles in the same way per point.

An example of selecting a point on a line in Inkscape. The point in blue to the left has been already selected, while the point in red is just being hovered over by the point-select tool.
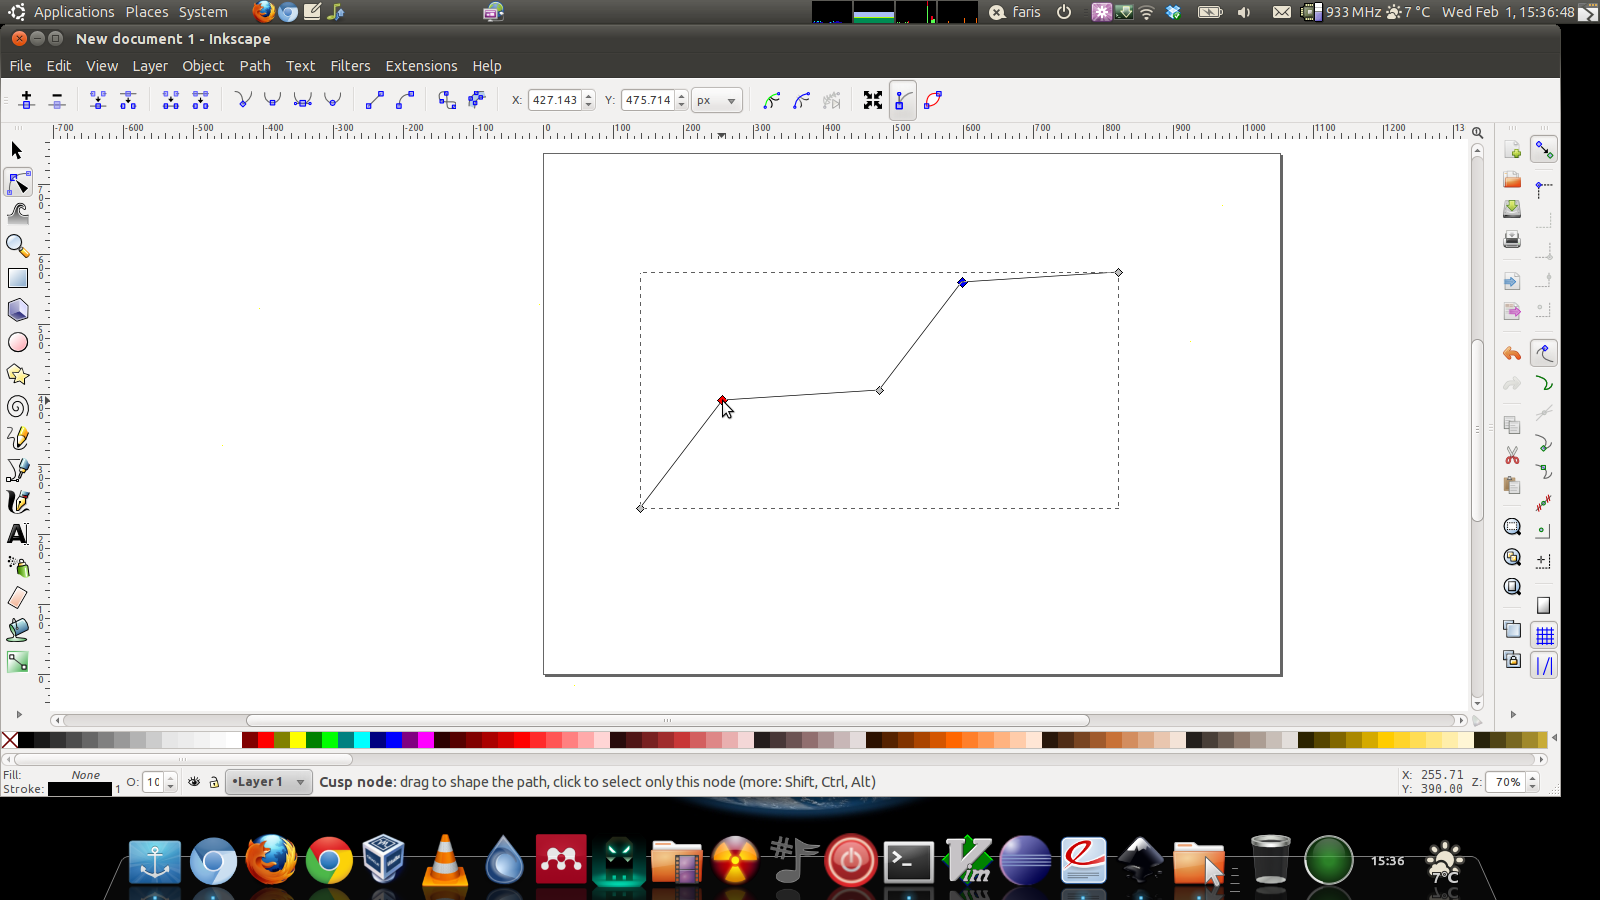
Two selected points that have been moved together by using the
shiftkey to select the points.
Object Positioning and Grouping
Another powerful feature of vector-editing programs (and the format in general) is the ability to chunk together lines and polygons into different groups. Objects are a functional grouping which is comprised of a group of lines and points sharing similar colour properties. For example, a red square with a purple border cannot be part of the same object as a blue square with a red border. In order to chunk together those objects, we place them into a group group.
After being placed into a group or object, the set of lines and polygons making up that chunk can be manipulated as you wish. When you are done making your grouped changes, you can ungroup those objects (also known as “breaking apart” objects). Understanding when to use groups and objects is essential to understanding vector-based imaging.
Groups and objects can be positioned on the z-index[^10] much like
layers. Options for each group or object move the object up or down on
the page. The option send to back will place the object on the very
“back” of the page, and the object will be covered up by any other
objects in “front” of it. The option send to front will conversely
ensure that no other objects can appear above the one sent to the front.
Basic Conversion Techniques (Raster to Vector)
Converting a vector image to a raster format is trivial, simply use the
Export as… function in the File menu of either Inkscape or
Illustrator. This conversion is easy because the image is being broken
down into pixels, rather than being turned into mathematical points.
Conversion from bitmap to vector is a lot more involved as a process. To
convert a bitmap image, you must first import the bitmap into the
program by clicking on File > Import… and selecting the bitmap you’d
like to convert.
Although there are a number of computational tools to assist you with this process, the best results are typically achieved by manually tracing the raster image into a vector format. Both techniques are discussed below.
Using the automatic conversion tools
To convert an image in Inkscape, open Path > Trace Bitmap… and select
the mode. Single-scan mode will create an outline while Multi-scan
mode will create a number of small polygons. Once scanned, you can
manipulate the image like you would any other vectorized image.
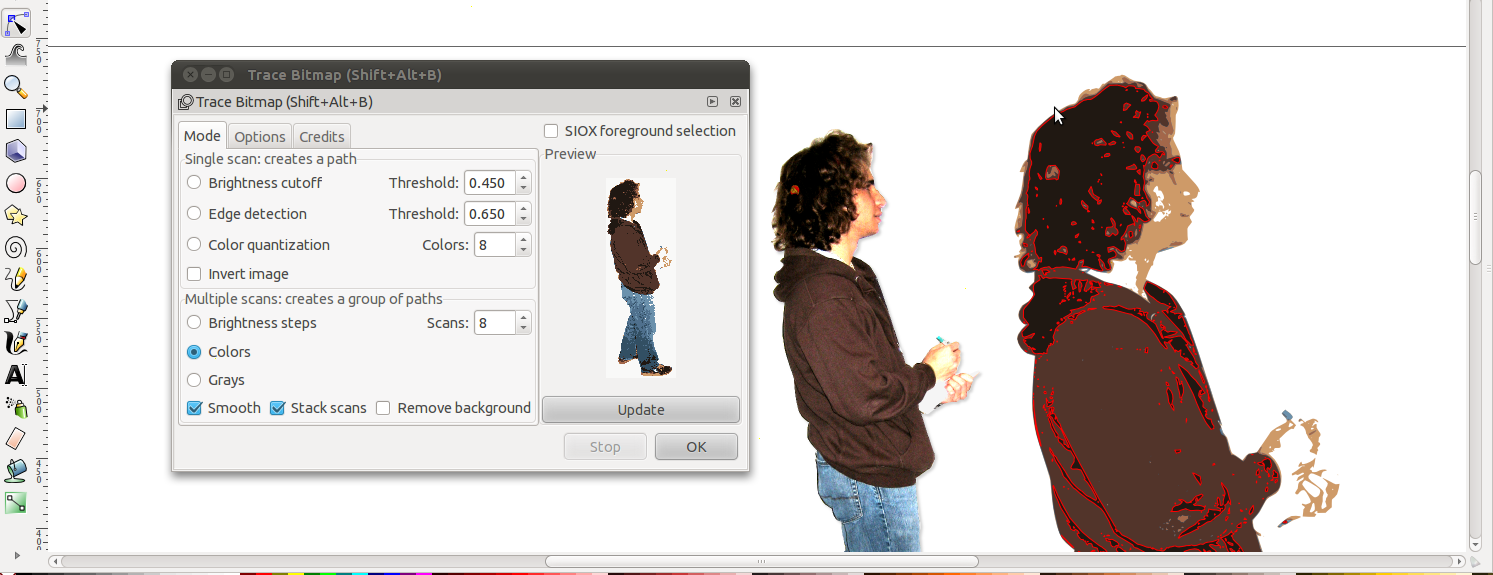
An example of the vector bitmap-tracing options. The
updatebutton. Shows what the conversion will look like, and pressingOKwill convert the image (a converted image is show on the right).
The manual method
To manually convert a bitmap to a vector, first import it (as described above). Next, be sure that the image is scaled up enough to capture the details you want to draw. Finally, place the image on a layer behind all others and lock the layer by clicking on the padlock icon. This will ensure that your new drawing will in no way affect the original image. Create layers above the original image and sketch around the image. Be sure to create groups for parts of the image which belong together. Before saving, be sure to remove the embedded bitmap, or your filesize will suffer.

An example of the manual conversion technique. Each coloured polygon is hand-drawn above the image. To achieve the highest quality, one can use a series of layers with varying transparencies.
Image File Formats
Terms
-
Transparency — The ability of an Image to show other colours or images from behind the image.
-
Lossless — The format will not lose quality upon continuous saving. Lossy formats will continuously apply compression, which causes a significant reduction of quality and size.
Image Filetypes
Images are mainly stored in two ways:
-
Raster/Bitmap: Each dot (or pixel) is stored into the file. Compression blends pixels together and zooming in on an image will cause dottiness.
-
Vector: Lines are stored into the image as mathematical formulæ.
Raster Image Filetypes
| Extension | Stands For | description | Windows App | Mac App | Linux App | lossless? | transparent? |
|---|---|---|---|---|---|---|---|
jpg/jpeg | Joint Photographic Experts Group | The basic filetype for taking photos from a digital camera | Image Viewer, Adobe Photoshop | Preview, iPhoto | Eye of Gnome, GNU Image Processor (GIMP) | No</td> | No | </tr>
gif | Graphic Interchange Format | The former standard filetype for web images. Lightweight, but bad for gradients and photos. Good for basic images | Image Viewer, Adobe Photoshop, Adobe Fireworks | Preview, iPhoto, Fireworks | Eye of Gnome, GNU Image Processor (GIMP) | No | Yes |
png | Portable Network Graphics | The new standard for web images. Lightweight and can handle gradients and photos. Superior text-rendering compared to JPG. | Image Viewer, Adobe Photoshop | Preview, iPhoto | Eye of Gnome, GNU Image Processor (GIMP) | Yes | Yes |
raw, crw, orf | uncompressed means Raw | The modern standard for image capture. No compression makes for big files, but no quality is lost due to compression. | Image Viewer, Adobe Photoshop (CS1 and later) | Preview, iPhoto | Eye of Gnome, GNU Image Processor (GIMP) (with UFRaw plugin) | Yes | No |
tif, tiff | Tagged Image Format | The standard for scanned documents or high-data images (such as geo-tagged images or archiving). | Image Viewer, Adobe Photoshop | Preview, iPhoto | Eye of Gnome, GNU Image Processor (GIMP) | Both (depends on compression) | No |
| Extension | Stands For | description | Windows App | Mac App | Linux App |
|---|---|---|---|---|---|
svg | Scalable Vector Format | The open standard for vector images. | Image Viewer, Adobe Illustrator, Inkscape | Preview, iPhoto, Inkscape | Eye of Gnome, Inkscape |
ai | Adobe Illustrator | Adobe’s proprietary format for vectors.
More advanced support for layers and masking. No real advantage over
SVG filetype. | Adobe Illustrator | Preview, Adobe Illustrator | Eye of Gnome, Inkscape |