This tutorial assumes that you have a basic background with wordpress Blog Posts and Events. Please review these tutorials before beginning this one.
Introduction: Beyond WYSIWYG
A WYSIWYG Editor (What You See Is What You Get) is a special type of editor which formats text as you type. When you publish the text, the text will appear in the same way it was edited. A common example of this software paradigm is seen in desktop word provessors, such as Word and LibreOffice. These editors show the user all the formating as they type.
Understanding Wordpress’s WYSIWYG
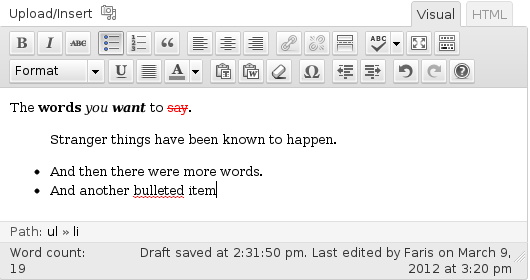
By default, wordpress’s admin editor is a WYSIWYG editor:
This makes it earier
for novice computer users to get started with simple posts and course
formatting. However, at times one may want to make finer adjustments to their
post. In these cases, one would use html to write their post.
Beyond Wordpress’s WYSIWYG
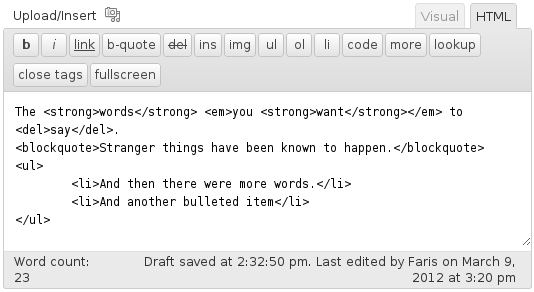
To switch to html in a post, click on the View Source tab in the content
editor on a page, post, or event:
Notice that the text is now in a fixed-width font. Fixed-width text as a
rule-of-thumb typically refers to computer languages. This sentence is an
example of a fixed width font.
Yes, it is ‘code’. No, you may not fret.
If you’ve been following this site belt-by-belt, you may have noticed that this is the first tutorial to include some code examples. Indeed, it is the only Green Belt tutorial with code (so far). Don’t fret, this stuff is very simple, you just need to start with some foundational concepts.
Tags and Boxes
HTML is not intended to be used to program a computer. Rather, its primary
use is to present data in a sorted way onto a web page. When your computer
opens a web page, all it is basically doing is opening an html file and
converting the html into an appropriate document layout based on rules in the
file. The same is true of all websites and all web applications. This makes
a cursory knowledge of html an essential asset to the modern information
worker.
Wordpress’s html editing also includes a few helper buttons which can be used
to tag highlighted text. To try this, go ahead and type some copy into your
content, highlight it, and click on the <i> tag (<i> is for italics).
Notice how every tag ends with a matching tag – all tags come in pairs.
For example, take the following sentence:
Learning
htmlis best done with Gusto and style.
This sentence can be written in html like this:
<i>Learning</i> <code>html</code> is best done with <b>Gusto</b> and <b><i>style</i></b>.Because html doesn’t care about white spacing between tag-pairs, the following code is also synonymous and valid:
<i>Learning</i>
<code>html</code>
is best done with
<b>Gusto</b> and
<b>
	<i>
		style
	</i>
</b>.
Notice how the last 5 lines of the example code has spaces? It will still show up in the same way on the browser, but now that the code is indented, it becomes easier to read. It is important to consistently indent your code.
One last concept to grasp about code is that not all of it will show on the
page. For example, this html:
<b>Hello!</b>
<!-- <i>Good bye!</i> -->
will show up as:
Hello!
Notice how anything between the <!-- and --> tags did not show up? This is
known as a comment and is used to communicate between programmers. It is
important to leave appropriate comments in order to show how a certain piece of
code works, to point to a function, or to take note of upcoming changes.
Comments are also used to temporarily disable code whilst debugging.
Even this page has some comments in it! Press ctrl+U to view the page source
in your browser (or click on View > Page Source...).
Boxes and Styles
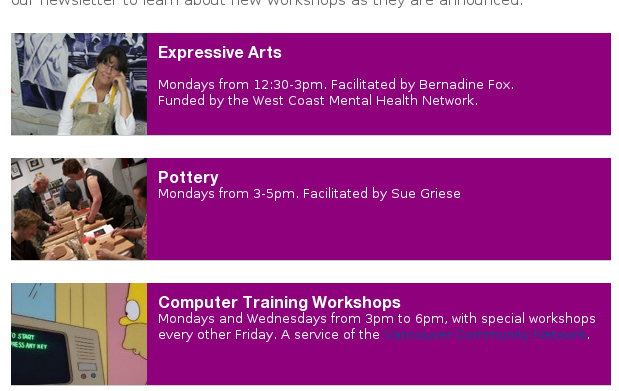
Turning back to wordpress, let’s look at an example in which a Page has
some custom html in order to feature workshops:
In this example, the workshop’s featured image is put on one side, while a title and short description are linked on the other side. The background of these boxes are also changed to a purple colour and the title is bolded.
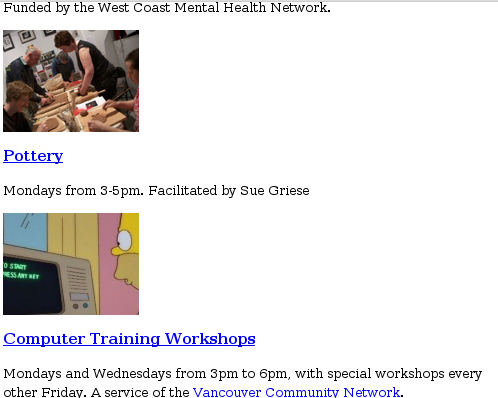
If we were to attempt to undertake this style with Wordpress’s built-in WYSIWYG editor, we would fail miserably. Look at this image if you don’t believe me:
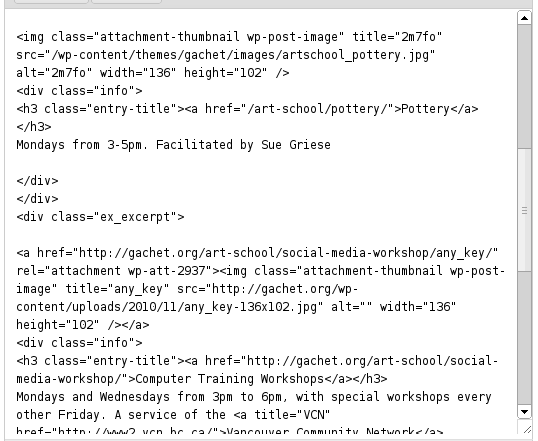
As you can see, the style is not correctly applied in the editor and the title, description, and image each appear on their own line. To resolve this, we must switch into HTML mode:
In this mode, we can start to see that the code has some custom styles
(advanced styles and html will be covered in a later tutorial, but for now just
understand that a style will change the properties of an html tag – like the
color of the font within it or its background).
Let’s take a look at just the code for these boxes:
<div class="ex_excerpt">
	<img class="attachment-thumbnail wp-post-image" title="2m7fo" src="/wp-content/themes/gachet/images/artschool_expressive_arts.jpg" alt="2m7fo" width="136" height="102" />
	<div class="info">
		<h3 class="entry-title">
			<a href="/art-school/expressive-arts/">
				<!-- edit title -->Expressive Arts<!-- end edit title-->
			</a>
		</h3>
		<!-- Edit content -->
		Mondays from 12:30-3pm. Facilitated by Bernadine Fox.
		Funded by the West Coast Mental Health Network.
		<!-- end edit -->
	</div>
</div>

<div class="ex_excerpt">
	<img class="attachment-thumbnail wp-post-image" title="2m7fo" src="/wp-content/themes/gachet/images/artschool_pottery.jpg" alt="2m7fo" width="136" height="102" />
	<div class="info">
		<h3 class="entry-title">
			<a href="/art-school/pottery/">
				Pottery
			</a>
		</h3>
		Mondays from 3-5pm. Facilitated by Sue Griese
	</div>
</div>

<div class="ex_excerpt">
	<a href="http://gachet.org/art-school/social-media-workshop/any_key/" rel="attachment wp-att-2937"><img class="attachment-thumbnail wp-post-image" title="any_key" src="http://gachet.org/wp-content/uploads/2010/11/any_key-136x102.jpg" alt="" width="136" height="102" /></a>
	<div class="info">
		<h3 class="entry-title">
			<a href="http://gachet.org/art-school/social-media-workshop/">
				Computer Training Workshops
			</a>
		</h3>
		Mondays and Wednesdays from 3pm to 6pm, with special workshops every other Friday. A service of the <a title="VCN" href="http://www2.vcn.bc.ca/">Vancouver Community Network</a>.

	</div>
</div>

<div class="ex_excerpt">
	<img class="attachment-thumbnail wp-post-image" title="example image title" src="/wp-content/themes/gachet/images/example-image.jpg" alt="example image alt" width="136" height="102" />
	<div class="info">
		<h3 class="entry-title">
			<a href="/the-link-to-the-post/">
			A Post Title
			</a>
		</h3>
		<strong>A weekly lecture series about being an artist, and the cultural landscape which artists inhabit.</strong>
		Thursday, January 19th + 26th, 7-9pm: led by Karen
		Thursday, February 2nd + 9th, 7-9pm: led by Bernadine.
	</div>
</div>
Warning: This is an example of messy code. If you program a website from
scratch, you should use a css stylesheet – not styles for individual tags
(such as width, height, and color).
Notice that this code has the introduction of a block tag. While <p>,
<b>, and <img> are all span tags, the block tag <div> can include
span tags within itself. The key difference between a block and a span
tag element is the box model. The box model determines the types of
layout properies a tag is using to set itself into a page. Block tags have a wide array of adjustments available to them, including: margin, padding,
border, and content.
Writing our Own Box via Copying
With this introduction to html and custom wordpress pages, let us conclude with an example of our own custom gallery box:
<div class="ex_excerpt">
	<img class="attachment-thumbnail wp-post-image" title="2m7fo" src="/wp-content/themes/gachet/images/default_exhibition.jpg" alt="2m7fo" width="136" height="102" />
	<div class="info">
		<h3 class="entry-title">
			<a href="/art-school/artist-reality/">
				The Artist's Reality
			</a>
		</h3>
		<strong>
			A short summary which will show up bolded
		</strong>

		More information and/or some dates.

	</div>
</div>
Let’s go through this code element-by-element. First we have the <div> class
"ex_excerpt" which surrounds the entire box. Next is an <img> tag which has
a few properties listed. Notablely, this image has a width and height
property. For one-off html editing (like in a wordpress page) this is not too
big of a deal. But for most projects, adding a width and height to an image tag
(aka HTML-Resizing) is not recommended1 as it causes image quality issues.
The next tag is another <div>, this time with the class "info". This
<div> is used to keep the text, link, and title to the right of the <img>.
The info box contains a heading tag (<h3>) which is also surrounding a link
tag (<a>) in order to turn the title into a link. Notice that link tags
(<a>) also require an href= linked to the URL of the document in
question.
Before the final closing tags (</div>), a <strong> tag is used to emphasize
the summary text, and the basic content is left without its own span tag
(although a set of <p> tags could also be used here).
Footnotes
editor (such as the GIMP or Photoshop) and use the re-sized images instead.
-
The preferred technique is to resize the image with a desktop-image ↩
